Wireshark GeoIP Mapping
Test Pcap
Grab a trace file to test your GeoIP mapping setup gen2-mapping
Download the GeoIP Database Files
Visit geolite2 to get the latest GeoLite2 free database files.
- GeoLite2-City[date].tar.gz_
- GeoLite2-Country[date].tar.gz_
- GeoLite2-ASN[date].tar.gz_
The files contain a date stamp indicating the revision date of the file. MaxMind updates the GeoLite2 Country and City databases on the first Tuesday of each month and the GeoLite2 ASN database every Tuesday.
Set Up a Directory and Extract Key .mmdb Files to this Directory
Create a directory on your drive called MaxMind. This is where you will put all your .mmdb files after unzipping them.
The MaxMind DB files you downloaded are in gzipped .tar file format. You'll need a tool to unzip the files (I use 7-Zip and WinZip on my systems).
When you unzip the files, you will have these three files: - GeoLite2-City[date].tar_ - GeoLite2-Country[date].tar_ - GeoLite2-ASN[date].tar_
Now the files are in .tar format (tarballs). We have one more unzipping process to go through. Unzip each of these .tar files. You will then have three directories containing the separate database files.
- \GeoLite2-City[date] directory containing the _GeoLite2-City.mmdb file
- \GeoLite2-Country[date] directory containing the _GeoLite2-Country.mmdb file
- \GeoLite2-ASN[date] directory containing the _GeoLite2-ASN.mmdb file
Finally, copy each of the .mmdb files from these directories into your \MaxMind directory. Your directory should look something like this
Add a Path in Wireshark Preferences
Note: This setting is unlike most other Wireshark preference settings. When you set up GeoIP mapping in a profile, the setting actually saved in the Wireshark default profile directory. This makes the GeoIP mapping available in all profiles.
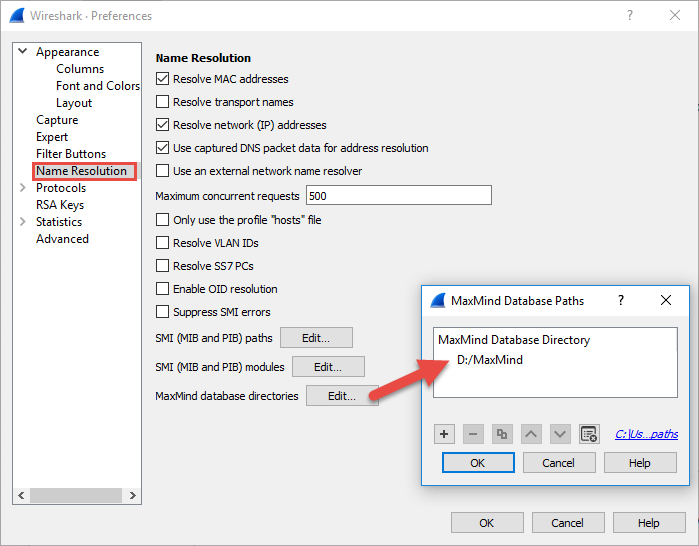
In Wireshark, select Edit | Preferences | Name Resolution. Next to MaxMind database directories, click the Edit button. Click the + button to add a directory and navigate to your \MaxMind directory. Click OK to select your \MaxMind directory and click OK to close the Preferences window.
Restart Wireshark.
Build Your Maps
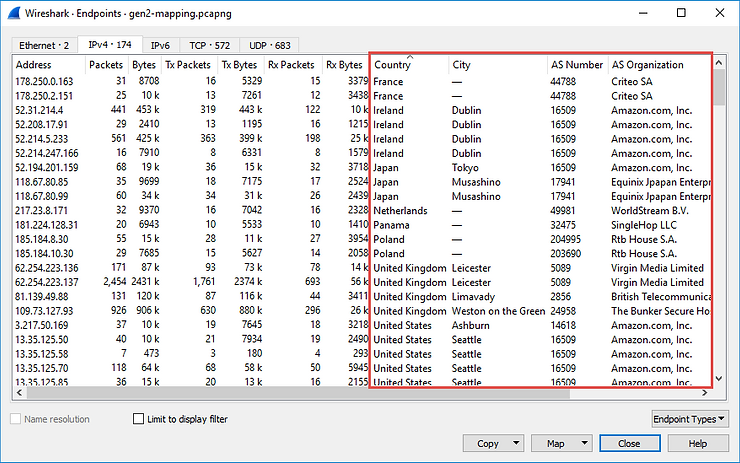
Now comes the cool stuff! Load a trace file in Wireshark and select Statistics | Endpoints. Click on either the IPv4 or IPv6 tabs to see if you have some City, Country, AS Number, and AS Organization information available. An example is shown below.
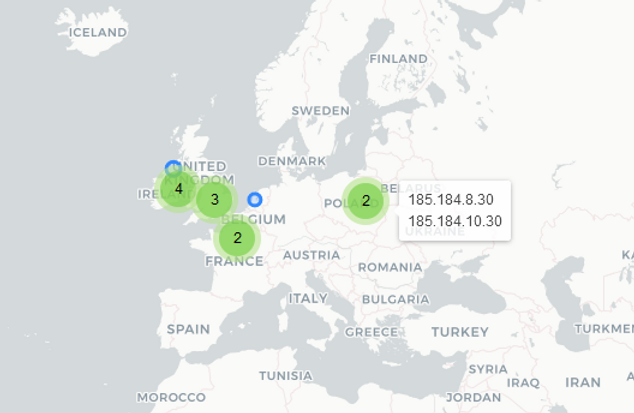
Notice the Map button on the bottom of the Endpoints window. Click the Map button and select Open in browser. Wireshark launches your default browser and maps endponits based on the information available in the GeoLite2 database files. Pretty cool, eh?
You can also right click on any Endpoint row and select Apply as filter, Prepare a filter, Find, or Colorize.
Filter on GeoIP Information
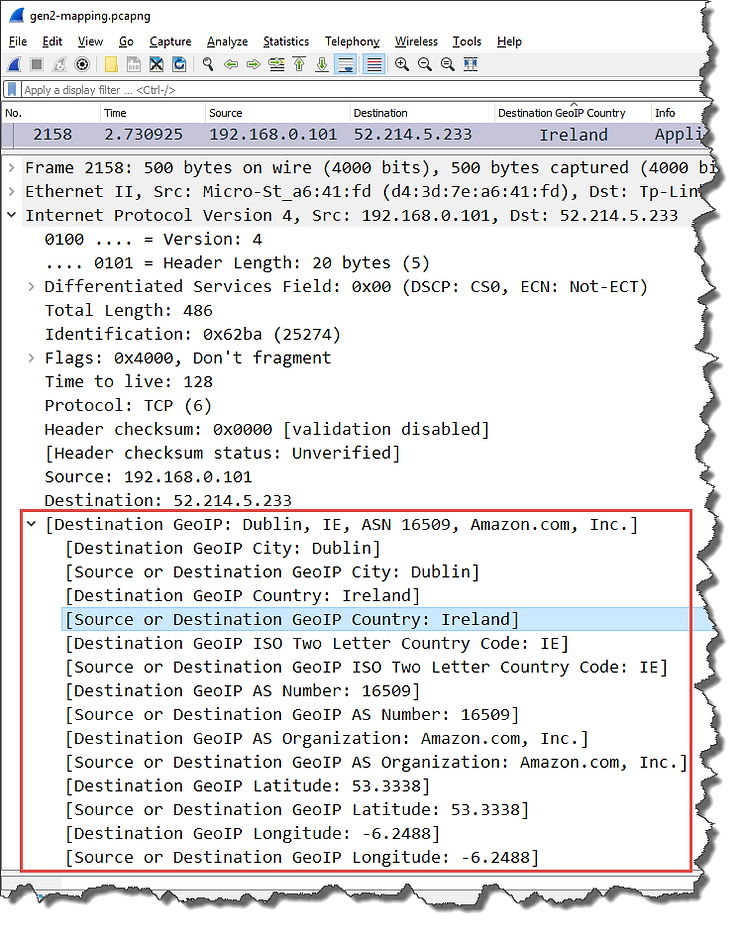
Here's another interesting thing you can do after setting up GeoIP mapping in Wireshark. Look inside the IPv4 or IPv6 headers of the packets. The GeoIP information is contained at the end of the IPv4/IPv6 header, as shown in the image below.
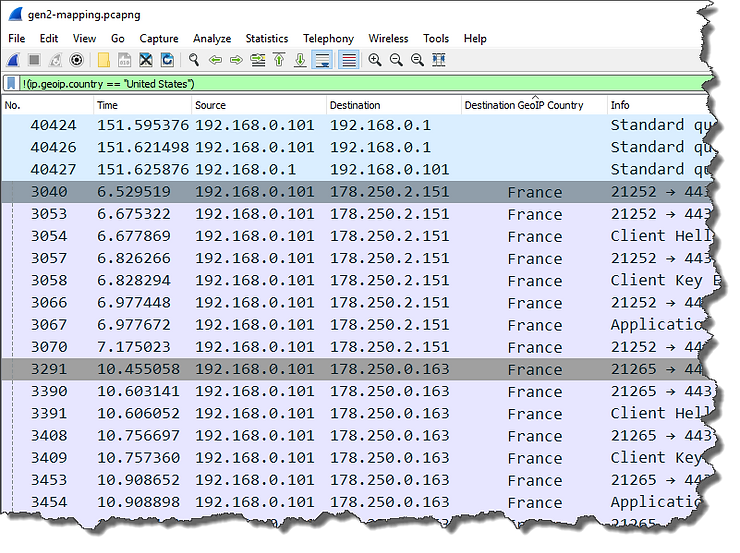
You can create filters based on these fields. Some filter examples are shown below. - Destination City [IPv4]: ip.geoip.dst_city == "Dublin" - Source or Destination City [IPv4]: ip.geoip.city == "Dublin" - Destination Country: ip.geoip.dst_country == "Ireland" - Destination Country based on Country Code: ip.geoip.dst_country_iso == "IE" - All Destination Countries Except United States: !ip.geoip.country == "United States"
Note that ip must be replaced with ipv6 if you are working within an IPv6 header.
Add and Sort GeoIP Columns
Consider right-clicking on any of the GeoIP lines shown in the previous image and select Apply as column.


