Console Settings Ruckus Brocade ICX
Connecting to the Console
There are two ways to connect to the configuration console of a new Ruckus ICX switch: either with a Telnet/SSH session over an IP network or directly through the serial interface.
Telnet or SSH
If a Ruckus ICX switch is connected to a network, it will automatically issue DHCP requests for an IP configuration, which will be provided by a DHCP server. Identifying the IP address that has been assigned to the switch can be done by viewing the address assignment list on the DHCP server or by the switch serial interface (using the show ip command)
Once the IP address of the switch is known, a Telnet or SSH session can be established using a terminal emulation program.
Note
The ICX7150-24F, ICX7150-C08P, and ICX7150-C10ZP switches ship from the factory with SSH enabled and Telnet disabled. All other switches have Telnet enabled only.
Ruckus ICX 7150 and Ruckus ICX 7650 (Serial connection)
The Ruckus ICX 7150 presents a USB Type-C connection, which can be connected directly to the USB port on a PC using a standard USB cable. Any standard USB Type-C–to–Type-A cable can be used; if you wish to purchase the cable from Ruckus, the part number is CC-USBC-USBA.
The Ruckus ICX 7150 and ICX 7650 switches also present a standard serial interface through an RJ45 connector. An RJ45-to-DB9F cable is included with each switch and, if required, additional cables can be ordered from Ruckus using part number CC-RJ45-DB9, which is comprised of the following two parts: - RJ45 to RJ45: Part number 50-1000117-01 - RJ45 to DB9F: Part number 50-0000112-01
Sources - ICX7150
Ruckus ICX 7250 and Ruckus ICX 7450 (Serial connection)
The Ruckus ICX 7250 and ICX 7450 switches present their serial interface through a mini-USB type connector, and every switch is shipped with a serial cable that terminates on both RJ45 and DB9 connections. The following two parts ship with every switch: - Mini-USB to RJ45: Part number 50-1000122-01 - RJ45 to DB9F: Part number 50-0000112-01
If required, these two parts can be ordered using part number CC-miniusb-RJ45
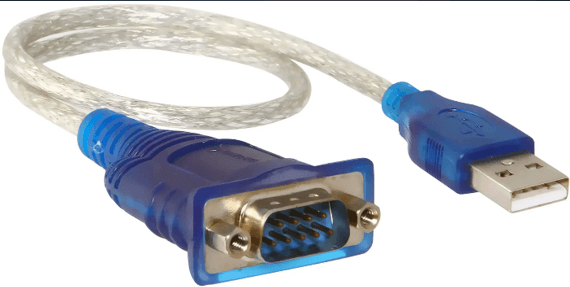
To connect a PC to the serial interface, a DB9M-to-USB adapter is required; this adapter can be obtained from an online electronics supplier.
Figure 1. DB9M-to-USB Adapter!

Once a serial connection to the switch has been made, a terminal emulation program can be used to access the CLI.
Establishing a first-time connection to the console port
You can use either the USB Type-C console port or the RJ-45 serial console port to establish the first time connection to the device. The console port allows you to configure and manage the device using a third-party terminal emulation application from a workstation that is directly connected to the port using a standard USB Type-C cable or RJ-45 serial cable. Perform the following steps to log in to the device for the first time through the console connection.
Do one of the following based on the Switch model and connector type
- Connect a standard USB cable to the USB Type-C console connector on the device and to a USB port on the workstation. To connect the USB Type-C console port on the device to a USB port on the workstation, you need a standard USB cable that has a USB Type-C connector on one end and a USB connector on the other end that matches the USB port on your workstation.
-
Connect a standard RJ-45 cable to the RJ-45 serial console connector on the device and to a USB port on the workstation. To connect the RJ-45 serial console port on the device to a USB port on the workstation, you need a standard RJ-45 cable that has an RJ-45 connector on one end and a USB connector on the other end that matches the USB port on your workstation.
-
Allow the workstation to automatically discover and configure the newly found USB device.
Note
If the workstation is unable to automatically discover and configure the newly found USB device, you can manually download the necessary device drivers for Windows, MacOS, and Linux from the following website: Ruckus Drivers
Ruckus 7150 USB Serial driver Windows - CP210x_Windows_Drivers.zip
Open a terminal emulator
configure the sessions parameters as follows:
- In a Windows environment, use the following values:
| Parameter | Value |
|---|---|
| Baud: Bits per second | 9600 |
| Data bits | 8 |
| Parity | None |
| Stop bits | 1 |
| Flow control | None |
Note
Flow control is not supported on the console connection when attached to a remote terminal and must be disabled on the customer-side remote terminal server in addition to the host-side clients.
- In a UNIX environment using TIP, enter the following string at the prompt: tip /dev/ttyb -9600
- If ttyb is already in use, use ttya instead and enter the following string at the prompt: tip /dev/ttya -9600
When the terminal emulator application stops reporting information, press Enter to display the device prompt.
Depending on the device you purchased, and the code (Layer 2 or Layer 3) loaded on your system, the device prompt is displayed accordingly.
When the device prompt is displayed, you are connected to the device. You can customize the prompt by changing the device name. If you do not see this prompt, make sure the cable is securely connected to your workstation and to the device and check the settings in your terminal emulation program. In addition to the previously configured session settings, make sure the terminal emulation session is running on the same serial port you attached to the device.
The device CLI prompt has the following access levels:
- User EXEC: This is the level you enter when you first start a CLI session. At this level, you can view some system information but you cannot configure system or port parameters.
- Privileged EXEC: This level is also called the Enable level and can be secured by a password. You can perform tasks such as managing files on the flash module, saving the system configuration to flash, and clearing caches at this level.
- CONFIG: The configuration level. This level allows you to configure the system IP address and configure switching and routing features. To access the CONFIG mode, you must already be logged in to the privileged EXEC level.
privileged EXEC mode
At the opening device CLI prompt, enter the following command to change to the privileged EXEC mode:
By default, the CLI is not protected by passwords. To secure CLI access, RUCKUS strongly recommends assigning passwords. You can set the following levels of passwords:
- Super User: Allows complete read-and-write access to the system. This is generally for system administrators and is the only password level that allows you to configure other passwords.
Note
You must set a Super User password before you can set other types of passwords. You can also assign other passwords using Brocade Network Advisor after an enable password has been configured for a Super User on the device using the CLI.
- Port Configuration: Allows read-and-write access to specific ports but not for global (system-wide) parameters.
- Read-Only: Allows access to the privileged EXEC mode and CONFIG mode but only with read access.
Note
Passwords can be up to 32 characters long. They must begin with an alphabetic character. They can include numeric characters, the period (.), and the underscore (_) only. Passwords are case-sensitive, and they are not displayed when you enter them on the command line.
configuration mode
device# configure terminal device(config)#
set the Super User password
Note
Make sure to write down the new passwords and keep the information in a secure location.
