Firmware upgrade with USB Ruckus Brocade ICX
Ruckus Switch Firmware Upgrade – Quick Steps
- download the new firmware from the this link [Ruckus support site].
-
Unzip the firmware files into the USB flash
-
Plug the flash drive into your switch’s USB port.
-
Console into the switch and make sure the USB drive mounts
-
Copy the bootloader software to the switch’s bootrom
-
Copy the firmware on your switches to the primary partition
-
Verify that the flash contents are correct
-
Make sure the switch is configured to boot from the primary flash partition
-
Verify that the configuration is set to boot from the desired partition
-
Save the configuration
-
Reboot the switch
-
Once reloaded, verify the proper firmware version is running
Ruckus Switch Firmware Upgrade – Detailed Steps
If you already completed the steps in the Quick Steps then no need to do this. These are the same steps, however more detailed in case needed.
-
Download firmware
Confirm the current approved DCD firmware version from [Here] and find it and download it from [Ruckus support site]
-
Unzip the firmware and put it on a flash drive
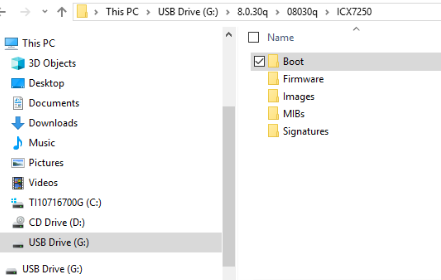
Sample file structure of a Ruckus switch firmware package
A Ruckus switch firmware package will generally include files for lots of different hardware platforms but you really only need two at a time – a bootrom (bootloader) file and a firmware image. First, extract the .zip file and navigate to the folder matching your Ruckus ICX switch family. Then copy the bootloader file from the “Boot” folder and the proper firmware files out of the “Images” folder. Remember to always upgrade the switch bootloader when you upgrade your primary firmware! If you don’t you could crash your switch. In the end you should have three files on your USB drive that look similar to the following. I’ll give more details on why you need all these a little further down in the instructions.
spzXXXX.bin– BootloaderSPSXXXXX.bin– Layer 2 firmware image (switching only)SPRXXXXX.bin– Layer 3 firmware image (routing and switching – L3 features generally require an additional license)
One final but important note – larger, modern flash drives may not work with your switch! For some reason Ruckus switches have a hard time reading drives that are 8+ GB in capacity. Ruckus switch firmware is small so I’d recommend you use the oldest and smallest flash drive you have for this process – 4GB or less in size. Also make sure your flash drive is formatted as FAT32, otherwise you might see the following error:
-
Plug the USB flash drive into your switch’s USB port
This is somewhat self-explanatory.
-
Console into the switch and verify the USB flash drive has mounted
Usually if your flash drive is formatted properly as FAT32 it will mount automatically. Try using the
show flash disk0command to find out. If the flash drive is already mounted you should see something like this:ICX7150-24P Switch#show files disk0 F 786944 mnz10110.bin F 28314668 SPR08061a.bin F 24723488 SPS08061a.bin D 4096 [----] disk0/System Volume Information 53825100 bytes 3 File(s) in disk0If it’s NOT already mounted, try
mount disk0and that should do the trick. If you get a mounting error then:- make sure the flash drive is formatted as FAT32.
- make sure the flash drive has < 4GB total capacity. If both those conditions are true and the drive STILL won’t mount try rebooting the switch.
-
Copy the bootloader software to the switch’s bootrom
For example: copy disk0 flash mnzXXXXX.bin bootrom
ICX7150-24P Switch#copy disk0 flash mnz10110.bin bootrom
Flash Memory Write (8192 bytes per dot)
ICX7150-24P Switch#.................................................................................................
SYNCING IMAGE TO FLASH. DO NOT SWITCH OVER OR POWER DOWN THE UNIT(65536 bytes per dot)...
............
Copy Done.
-
Copy the primary firmware to the switch’s primary flash partition 6.1. Use
show versionto find out your current firmware version, then useshow flashto find out where that firmware is stored. 6.2. Use the copy commandcopy flash flash [primary | secondary]to put a copy of your firmware into the unused flash partition.Example
ICX7150-24P Switch#copy disk0 flash SPS08061a.bin primary ICX7150-24P Switch#Load to buffer (8192 bytes per dot) ......................................... SYNCING IMAGE TO FLASH. DO NOT SWITCH OVER OR POWER DOWN THE UNIT(65536 bytes per dot)... ................................................................................................. Copy Done. ICX7150-24P Switch#copy disk0 flash SPR08061a.bin secondary ICX7150-24P Switch#Load to buffer (8192 bytes per dot) ....................................... SYNCING IMAGE TO FLASH. DO NOT SWITCH OVER OR POWER DOWN THE UNIT(65536 bytes per dot)... ................................................................................................ Copy Done. -
Verify the Flash Contents are Correct After you’re done copying the firmware over, make sure everything is where you want it to be. Run
show flash -
Force the Switch to Boot from Primary Flash By default, a Ruckus switch will boot any valid firmware found in its primary flash partition but It's prefered to always specify which partition to use. Use the commands below to force the switch to boot from your primary partition.
Example
-
Verify the Switch will Boot from the Desired Partition
Before reloading the switch confirm which flash partition the switch will be booting from. Run
show running-config | include boot -
Save the Running Configuration
Make sure to save your configuration write memory This will make sure your boot settings from the previous step are saved through the reboot.
-
Reload the Switch
For the firmware upgrade to take effect you have to reboot the switch, use
reload -
Confirm the Upgrade
Once the switch has reloaded make sure the correct firmware version is active. Run
show versionICX7150-24P Switch#show version Copyright (c) 1996-2017 Brocade Communications Systems, Inc. All rights reserved. UNIT 1: compiled on Aug 14 2017 at 06:54:44 labeled as SPS08061a (24723488 bytes) from Primary SPS08061a.bin SW: Version 08.0.61aT211 Compressed Boot-Monitor Image size = 786944, Version:10.1.10T225 (mnz10110) Compiled on Sun Jun 25 09:25:15 2017 HW: Stackable ICX7150-24-POE ========================================================================== UNIT 1: SL 1: ICX7150-24P-4X10GR POE 24-port Management Module Serial #:FEA3217N0LA Current License: 4X10GR P-ASIC 0: type B160, rev 11 Chip BCM56160_B0 ========================================================================== UNIT 1: SL 2: ICX7150-2X1GC 2-port 2G Module ========================================================================== UNIT 1: SL 3: ICX7150-4X10GF 4-port 40G Module ========================================================================== 1000 MHz ARM processor ARMv7 88 MHz bus 8192 KB boot flash memory 2048 MB code flash memory 1024 MB DRAM STACKID 1 system uptime is 1 minute(s) 19 second(s) The system started at 02:06:21 GMT+00 Wed Jan 05 2000 The system : started=cold start